Google Tag Manager part I: not as techy as you thought

In this competitive era of online marketing and fundraising, we are all eager to know how our websites are performing. Meanwhile, actually implementing a tracking code to accomplish this can be a real pain. However, our marketers here at Sanky have the answer: Google Tag Manager (GTM). With our helpful guidance, you will be setting up tracking pixels within “tags” in no time, while GTM does the hard work for you—no code contaminated, no data lost.
Step 1: Set up your account
First things first, set up a GTM account using any preferred Google
account—whatever you use for Google Analytics would be perfect.
Step 2: Create tags in Container
At first log-in, a window of code will pop up. This snippet is what we call a “container.” A container is like a magic box, which holds all the tags inside. What we need to do is simply place this “magic box” in to the templates of website or page wrappers in any CMS (e.g. Convio). They even have a Drupal module available for developers to use.
To begin the creation of a new tag, just select the “New Tag” button within the “Container” tab which appears in GTM’s main menu.
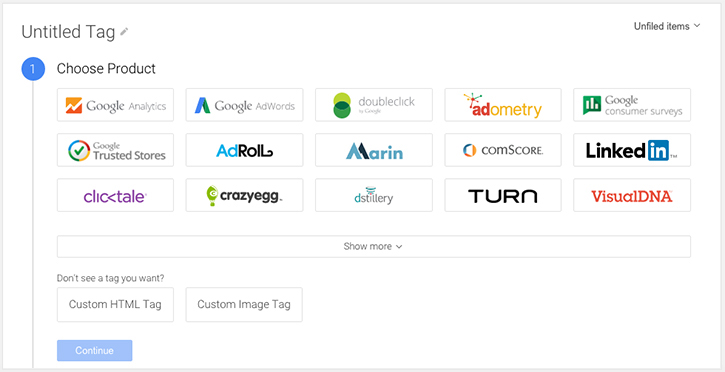
Step 3: Choose your product
Once you are in the “Container” section, you will then have the option to “Choose Product.” If the product isn’t available, we can manually add the script to “Custom HTML Tag” and “Custom Image Tag.” This is super useful when we work with Bing Ads, Facebook Conversion, Silverpop, Quantcast, and many other tracking tools that are not affiliated or partnered with Google.
Step 4: Choose your “tag type”
The tag type will determine the system your tag is collecting data through. All you really need to remember about this particular step is that, "Universal Analytics is the new operating standard for Google Analytics." You will want to select this Tag Type going forward instead of “Classic Google Analytics.”

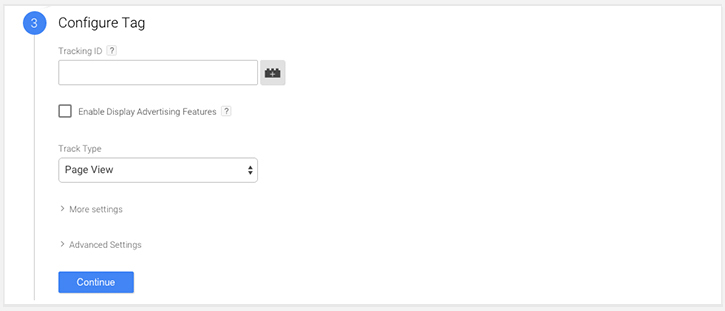
Step 5: Configure your tag
Next, you will be prompted to “Configure Tag.” For the purposes of this guide, we will just be configuring a tag for basic page views.
To accomplish this, you will select “Page View” within the Configure Tag step.
Be sure to stay tuned for Part II of this post, where you can learn much more in-depth instructions on advanced settings and configuring a tag for “cross-domain tracking”—an essential piece of knowledge for every nonprofit that tracks multiple domains and subsections under one property ID.
Just sign up at the bottom of this post to get updates sent right to your inbox!
Step 6: Select your trigger and “Fire On”
Following that, the final step will take you to “Fire On,” where we select “triggers.”

To track page views, like Universal Analytics does, just select “All Pages.”
For more advanced tags, you will need to set complex variables and conditions under the “Some Pages,” “Click,” and “Form” sections. (For example, Ecommerce-Tracking tag should only fire on the confirmation pages of successful donations and AdWords Conversion tag only on SEM landing pages).
Once you have selected one or more triggers, you can hit the “Create Tag” button. And there it is—your tag is in action!
Now, you might be asking how you can tell if your tags are firing correctly? Tag Assistant is your friend here. It’s easy to use and works like a charm.
TIP: As you continue to work within GTM, always remember to publish tags after saving them! GTM will store each published tag as a new version which makes it easier to switch among different sets of tags for your campaigns.
Once you get comfortable with Google Tag Manager, tracking and understanding your website can finally become one less frustration for your nonprofit to stress over.
We hope you found this guide helpful. Don’t forget to sign up below for updates on part II of our series as our web producer Yi dives into setting up cross-domain tracking.