Google Tag Manager part II: On the right (cross domain) track
Last week, our Web Producer Yi showed you some of the fundamentals of Google Tag Manager (GTM), so you could begin setting up tags and tracking your website performance like a champion. Now, she is going in-depth on enabling cross domain tracking in GTM—a crucial piece of the GTM puzzle for many nonprofits.
As you probably know, many nonprofits have multiple domains and subsections that are tracked under one property ID. For example, your nonprofit’s site may have a main website and a separate donation page. If someone goes from your main website to that donation page, and you do not have cross domain tracking enabled, then their visit will be tracked as two separate sessions. Consequently, your tracking will be inaccurate. To keep this from happening, it is essential to set up cross domain tracking.
Here is how you do it:
(Note: If you have NOT read Part I of this series, I suggest you take a look now. It will help you set up an account in GTM and give you more background on the following steps).
Step 1: Choose your “Fields To Set”
In your Google Tag Manager account, create your tag as you normally would (see part 1, step 1-4) until you reach the “Configure Tag” step. At which point, you will need to click on the “More settings” option right below the page view tag. You will then see a “Fields to Set” option. Clicking inside “Field Name” box, will give you several options to choose from. Select “allowLinker.”

Now that allowLinker is set, click within the “Value” option to the right and set to “true.” Google Analytics will now check to see if the linker parameter (which contains the Client ID and Timestamp) has attached in the URL and is no less than 2 minutes old. If so, it will take the client ID value from the linker parameter and save into the cookie.
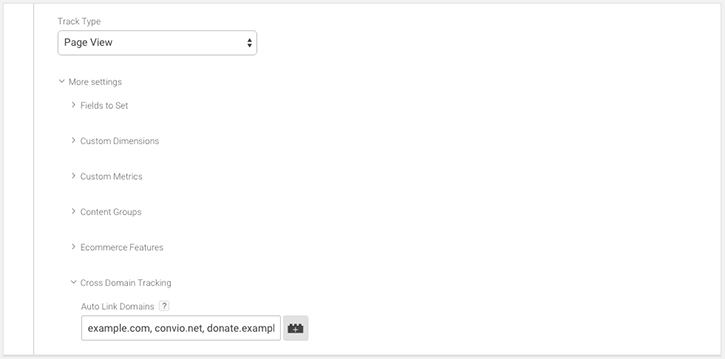
Step 2: “Cross Domain Tracking”
Now that you have set up your different fields, find the “Cross Domain Tracking” section below the “More settings” option in Configure Tags. Click within the “Auto Link Domains” box and add in your different site domains separated by commas (as shown below).
This will automatically implement cross domain tracking across the sites you entered with the autoLink plugin. An “event listener” will also add to the document body so anytime a user presses the mouse button or screen, or releases a key, it will trigger the autoLink plugin to decorate links in the page with the linker parameters.
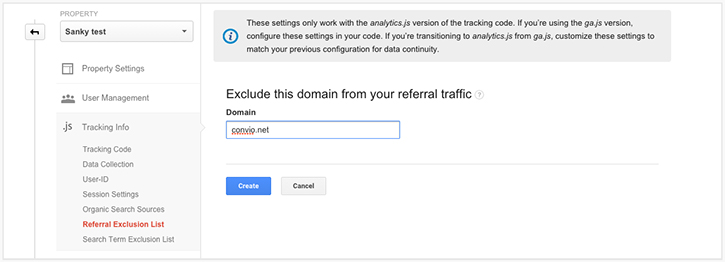
Step 3: Setting up referral exclusion
The final step ensures that any referral data from your sites are reported correctly. Here, you will go to your Google Analytics account. On the main page, find the section listed as “Tracking Info.”
Find the “Referral Exclusion List” option and within the “Exclude this domain from your referral traffic,” enter all your domains and subdomains. This ensures that they don’t show up as referrals in your report.
And there you go! Now you will have accurate reporting and tracking across your multiple site domains and subsections without worry.
Do you have any other questions you’d like answered about Google Tag Manager? Send them our way online at either Twitter (@SankyInc) or Facebook (facebook.com/SankyCommunications).

Like what you read? Check out this related post: